Pages

Sunday, January 29, 2012

valentines wreath

Another project for my
 Image Detail

pinterest challenge!


I found a super cute valentine wreath with a tutorial here on the Idea room (via pinterest of course).

It's pretty much the same techniqe as my chrsitmas tree pillow which means is was fun & easy!

Here's how my wreath turned out:


I used 3/4 yard felt and cut 3" circles.
The wreath form was from Hobby Lobby - I think it was a 14" form
(they only had one size for heart shaped ones)


I love it! I'm taking it in to work tomorrow to brighten up my office!


Shared on Whipperberry.com

Thursday, January 19, 2012

chai latte cupcakes

Remember my

 Image Detail

pinterest resolution?!?!
(see here)


Here's my first of  twelve pinterest projects!


Chai Latte Cupcakes


They tasted just like a cup of Chai Tea Latte fresh from my Keurig... which is delish!

The origional source for this recipe is a lovely website called The Culinary Enthusiast


Chai Latte Cupcakes


chai spice mix:

1 1/2 teaspoon ground cardamom
1 1/2 teaspoon ground cinnamon
1/2/ teaspoon ground ginger
1/4 teaspoon ground cloves
1/4 ground nutmet

Mix all spices in a small bowl or bag and set aside.

cupcake batter:

1 stick butter
1 cup sugar
2 teaspoons vanilla extract
2 eggs
2 teaspoons chai spice mix (see above)
1 1/4 cups flour
1/2 cup buttermilk
1/2 teaspoon baking soda
1/2 teaspoon cider vinegar

Cream together butter and sugar. Add vanilla, eggs, & spice mix. Alternately add flour and buttermilk until combined. In seperate small bowl stir together baking soda and vinegar, then add to batter mixture and stir until combined. Fill upcake pan 3/4 full and bake in oven preheated to 325 for 17- 20 minutes.

frosting:

2 sticks butter
1 teaspoon vanilla
3 cups powdered sugar
remainder of spice mix

Beat butter until smooth. Add vanilla and spice mix. Gradually add powdered sugar until smooth. Add 1 tablespoon of milk if need to form spreading consistency. Ice cooled cupcakes and then devour them! 


My mouth is watering... if your is not, then you are a stronger person than I am!


Linked up at Whipperberry


Saturday, January 14, 2012

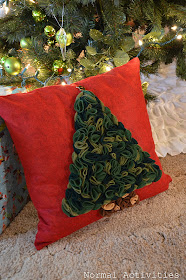
o christmas tree... pillow project!

Ok ok, I know this is a Christmas project - meaning I'm a total slacker when it comes to blogging in a timely fashion, but better late than never... right?

My friend showed me this cute pillow from crate & barrell... she wanted help to figure out how to make it for her mom for Christmas. Hers turned out so well, that I decided to make one for Kevin's mom too!

Image Detail


This is how mine turned out!


Supplies:
1/2 yard red felt
1/4 each of 3 different shades green felt
scrapes of brown felt
18" pillow form
star button
matching thread


First cut 2 18"x18" squares of red felt for the pillow front and back.
Then cut a tree pattern out of paper. My tree measured 11" across the bottom and is 11" high.


Trace the tree pattern onto one of the 18"x18" red squares and add a tree base.


Cut 2" circles out of the green felt. I used about 60 circles of each shade.
Cut 1 1/2" circles out of the brown felt I used about 20 total.


To begin sewing, take a circle


fold the circle in half


and then in half again so you have a quarter circle showing now


hand sew at the corner of the circle, going through all four layers & attaching it to the 18"x18" pillow front. Sew around the outline of the tree first and then fill in the rest of the tree. Add the brown for the trunk and then the button star to the top.


Sew the front & back of the pillow together and stuff with the pillow form. Make sure to leave a large enough opening for the pillow form because felt stretches easily.


This was such a fun project to do and it looks so festive!


Have fun making your own... you know you want to!


Fun enough to share on:


Tuesday, January 10, 2012

happy bee day, ella! {part 1}

It seems like just yesterday when I took Ella's 6 month pictues, but it was actually 6 months ago!
The little beauty just turned one and I got to help her mama out with some fun details for her 1 year "bee" day party!!!

Warning: there are a googillion pictures in this post, but I seriously cut out some very cute pictues and tried to narrow it down to the cutest and most detailed shots... however, Ella is very cute and there were lots of great party details so there's still a googillion pictures to enjoy!


Party decorations


Family pic


Let's get this party started already!


The dessert table was awesome!!!


Amy & I made this bee cookies earlier in the week. I love how they turned out!


The food table, pre-food :)


I actually made the beehive cake... and I'm pretty proud of it! Amy & I did a practice cake back in December and boy was that a lifesaver!


There were so many cute details, like this fun note station


Amy even made Ella's dress!!! I got to help too, but Ella's the one that made it look special :)


More cute details


Aren't these honeybear bottles filled with lemon heads just the cutest?!?!


make sure to check out the gift opening and cake eating in part 2 of this post, here.


happy bee day, ella! {part 2}

This post is continued from here. Be sure to check out the food & decorations in part 1.


After the bee bee Q sandwiches and bee nector it was time to open gifts.
Ella knew what to do


and so did her big cousin, Tessa!


Finally it was time for some birthday cake!


Where's my cake???


Ella got her own mini beehive cake.
She was a little cautious getting started


but it didn't take her long to figure things out...


...take a handful and stuff it in!


getting drunk on sugar :)


must eat more


do you see my belly... it's full of cake!!!


This party was sooo much fun!! Fun to prep for and fun to enjoy!
Great idea, Amy & great job being so cute, Ella!