Sunday, April 29, 2012

unexpected guest

Yes, that's right. We have an unexpected (and temporary) yard guest.

It's a possum!


It's got the dogs in a tizzy and Callie even got one of it's babies.


Kevin says I'm not allowed to say it's cute... 


but it kinda is :)


Saturday, April 21, 2012

cadbury egg cupcakes

I made these very yummy cadbury egg filled cupcakes for Easter.
I know, I know, Easter was two weeks ago now - but I've been busy!


These cupcakes have a mini cadbury creme egg inside a chocolate cupake topped with vanilla buttercream. YUM!


These cupcakes have a mini caramel cadburry egg in a chocolate cupcake with caramel buttercream. YUM again!


These cupcakes are easy. All you have to do is freeze the mini cadburry eggs and add them to your cupcake pans filled with batter just before baking! Told you it was easy!


Now you just have to wait a year until you can find mini cadburry eggs in stock at the grocery store again. Interesting note, my friend Sarah is from England and she says they have cadburry eggs in the store all year long!


Friday, April 6, 2012

pillows for klarisa

I have a friend who is my pinterest soul-mate. That sounds pretty intense, but basically, everything Klarisa pins I want to pin... and do and make. That is not meant to be creepy and I could have just said "Klarisa has good taste", but I hardly feel like that covers the depth of my appreciation for her hunting out the good stuff or the speed with which I click repin. Haha!


To show my appreciation, I made 3 pillows for Klarisa that we had both pinned close to the beginning of our pinning days. 

The first (and my favorite) is this cute little bird pillow found via pinterest, but origionally from this cool etsy shop. This is my version:


Next is this pretty ruffle flower pillow.
(I do not have a direct link for this pillow. I read & combined several tuturials found via pinterest - my DIY instructions are below)


Finally, I made a kite pillow in the same style as the bird pillow and inspired from the same etsy shop


I love how cute they all are!


Here's my steps for making the purple flower pillow - it's so easy and fun I feel guilty for not making letting Klarisa do it herself!


I cut several 2" strips of stretchy soft fabric (like jersey material, but I used the less expensive version)


I believe I ended us using 5 strips, but how much you need/use depends on the size of your pillow.


Then I sewed down the middle of the strips of fabric on my largest stitch setting to create a "ruffled" strip.


At frist I sewed my strips together, but then I found it was easier to work with them if I had somewhat shorter pieces and it did not change the end results/look - so I would skip that step next time.


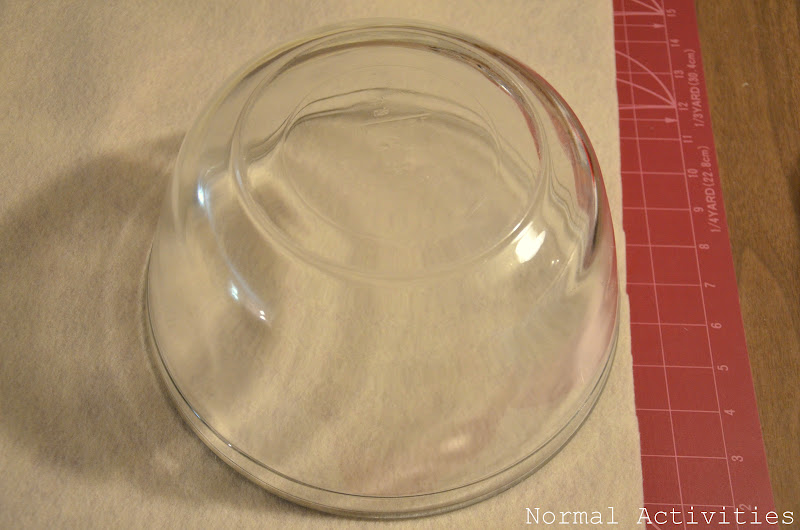
Next I used a large kitchen bowl as a circle pattern.


And cut a circle out of felt for my flower base.


It's time for flower asembly!

Fold the ruffled strips in half, so that the stitching is at the base.


and start hot gluing. Apply the glue to the felt circle and then press the strips of folded fabric (at the base where the stitching is) to the felt.
I started at the center of my circle, but saw tutorials that started from the outside instead.
I'll have to try that next, and give an update if I find one way is easier than the other.


Sorry I didn't take good pictures during the glue stage, but I had to keep moving!

Here I am holding back the previous layer of ruffles so I can glue the next layer a little closer for a fuller look.


To finish the pillow, I just trimmed the felt as close as possible and glued it to a pillow front. I used hot glue for this step and immediately put a heavy book on the glued flower to help is set flat.


Isn't is just so pretty and ruffly?!?!


And here is another bird pillow shot just b/d it's still my favorite!


shared at whipperberry.com


Sunday, April 1, 2012

it smells like coffee around here

I read on pinterest that if you burn tea candles in coffe beans it smells like freshly roasted coffe.
We don't drink lots of coffee around our house, but we love the smell so this was a must try!

It works great! I got french vanilla beans and it's a very nice comforting smell!


Another project in my pinterest

Image Detail

project resolution challenge!
(see here)

Sunday, March 25, 2012

limoncello cupcakes

Don't these just look absolutely dreamy???


trust me... they are!!!


lemon cupcakes with lemon curd filling and lemon buttercream

I'll repeat: lemon love, love lemon, lemon, lemon, lemon, love, love, love :)


Limoncello Cupcakes

cupcakes:
1 1/2 cups all-purpose flour
1 teaspoon baking powder
1/2 teaspoon salt
1/2 stick butter
2 oz cream cheese
1 cup sugar
3 large eggs
1 tablespoons limoncello
1/2 cup buttermilk
1/4 cup lemon juice
zest of one lemon

Beat softened butter and cream cheese. Add sugar and mix until light and fluffy. Add eggs, one at a time, mixing well after each. Add the limoncello and beat until well mixed. Sift together flour, baking powder and salt. Alternately add flour and buttermilk to butter mixture. Mix in the lemon juice and lemon zest just until combined. Pour into prepared cupcake pans (it made 18 cupcakes for me) and bake at 325 for about 17 minutes. Cool on wire racks.

lemon curd filling:
1/2 cup lemon juice
zest of two lemons
1/4 cup sugar
1 egg
1 egg yolk


Mix lemon juice, lemon zest, and sugar of medium heat until boiling. Whisk egg and egg yolk. Whisk lemon mixture into eggs off the heat (to temper). Add all back to sauce pan and cook over medium heat, whisking constantly, until thickened. Cool completely.


Use a melon baller to scoop a hole into tops of cooled cupcakes. Fill with cooled lemon curd.

lemon buttercream icing:
1/2 stick butter
6 oz cream cheese
4 cups powdered sugar
2 tablespoons limoncello


Beat butter and cream cheese. Add limoncello and beat until smooth. Beat in powdered sugar until desired icing consistency is obtained. Ice filled cupcakes. Garnish with lemon slices.


They are so pretty and so yummy! Especially to someone who enjoys lemon as much as I do!
A perfect summer treat!
 (and even though it's only March, since the weather has been between 70 - 85, I'm in full summer mode)

Recipe origionally found here (I adapted the buttercream to my taste)


Saturday, March 17, 2012

rolo pretzels

How do you feel about: Chocolate? Caramel? M&Ms? Pretzels?
Pretty good right???
How about all together?
Pretty great right???

I made these easy rolo pretzel treats and they were a huge hit at work and at a game night with friends!


All you need is:

1 bag unwrapped rolo chocolate caramels
pretzels
M&Ms

You just place the the pretzels on a cookie sheet lined with parchment paper.
Place a rolo on each pretzel and melt in oven set on 300 for 5 min
(the rolo's should be slightly melted, but still hold some shape).
Take the tray of pretzels out of the oven and press 3 M&Ms into each rolo pretzel.
Let set and then try not to eat too many at once!


Sunday, March 11, 2012

you are my sunshine, my lovely sunshine

You are my sunshine, my lovely sunshine...


I instantly fell in love with this pillow I found via pinterest


it's origionally from here, but it was a wee bit of a luxery item at $159!

Then I saw this great tutorial, also via pinterest, for the same style pillow.

I've never loved using stencils because I have a hard time getting everything lined up and looking as neat and straight as I want it to, but I kept thinking about this pillow and then a lightbulb went off!!! I used scrapbooking letter stickers instead of a stencil, it was easy and I love how it turned out!


Here's the breakdown of how I did it:

I cut an 18" square of fabric (for a 18" pillow form) and taped it to a 17" square piece of cardboard.


Here's the front


and here's what the back looked like at that point.


Next, I marked off even sections with a water soluble pencil (so I'd be sure to have straight lines across the pillow). I'm somewhat of a perfectionist, but I don't think this step was necessary and would skip it next time because of how well the ruler worked in the next step.


I used a ruler and placed my letter stickers how I wanted them to look (there are lots of different styles of letter stickers in the scrapbooking isle and they are only about $1.50 a package when Hobby Lobby does their half price sale).


The stickers provided a great visual and I was able to move them around a little until I had everything to my liking before I made any permanent marks on my fabric.


I then used a fine point fabric marker to outline the letters,


once all the outlining was done I removed the stickers,


and filled in the letters with a larger tip fabric marker


I heat set the pillow front by ironing it, attached a pillow back with a zipper enclosure and washed out the water soluble pencil lines.


Now I have a great pillow to prettify my deck!!!


You are my sunshine
my lovely sunshine
you make me happy
when skys are grey
you will know dear
how much I love you


Just another installment in my pinterest

Image Detail

project resolution challenge!
(see here)